Wednesday, December 28, 2011

Tacky X-mas Party

This year, we decided to do a little something different for our Storm Squad Christmas party. We hosted our party at Kanki Japanese Steakhouse rather than having it at one of our houses (most likely Courtney's house).  The reason for this switch up was because it can get so crazy around the holidays and not one weekend seemed to work out where we could throw such an elaborate/over the night get together.  It was hard throwing it at a restaurant though because you are on their schedule. Although we reserved a room, they weren't very respectful of the time and people were getting very hungry!  I would only ever suggest throwing it at a Japanese Steakhouse if you can make the room completely private (which is what we thought we were getting..oh well!).
Tacky Christmas Hostesses
Courtney, Catherine, Kimberly, Allison
The first thing we had everyone do once they sat down was fill out who should win the tackiest Christmas sweater on these cute ballot cards that Allison made. One side was a vibrant turquoise and the other side was a zebra print on felt scrapbook paper...I almost didn't want to write on it and ruin it! Courtney created a ballot box made from an old tacky sweater and a shoe box...totally perfect for our theme! After everyone had voted, we tallied up the ballots and although it was a very close race between the bossman Jon and Ashley Virginia, the lady in pink won! Allison also created a little gift for the winner filled with Christmas goodies, an iTune card and other misc. items. There is a lot going on in the picture to the left...Courtney just revealed the winner, Jon is upset he didn't win and is whipping his napkin at Courtney, AV is excited she just won, the others at the table are laughing and clapping and the table behind us is probably thinking we are all a little off our rocker.

AV - Tackiest
sweater winner!
While people were sitting and hanging out, we had these theme appropriate picture frames on every table. We googled "tacky sweaters" and "awkward family Christmas photos" and printed off quite interesting photos which definitely got a good laugh and added a personal touch to our very customary seating arrangements.
Catherine made the most interesting photo props for the party...Mustaches and Santa beards with mustaches and kissy lips. So simple and so cute! She used the wide popsicle sticks, cut out mustaches and beards from paper, glued cotton balls onto the beard template and glued mustaches on top of some of the beards and kissy lips on the others!
Kim and Courtney made the party favors for everyone to take home that evening. The base of the martini glass was dipped in chalkboard paint and had everyone's name from the party written on the bottom. Different designs were created with glue on the clear glass ornaments bought from AC More. We then dumped silver glitter on top of the glue and let it dry over night before placing a red feather into each ornament. The ornaments sat in the martini glass and were wrapped beautifully in cellophane with red and green ribbon!
This is the majority of our promotions team looking fabulous with our beards and mustaches! We are also standing in front of a box of donated toys which we all brought to the dinner party in order to donate to the Carolina Hurricanes toy drive. With the box overflowing with gifts to give, I can only imagine the smiles that were put on some of the kids faces upon receiving them! Thank you to all those who helped, all those who donated, and all of those who came out to celebrate our tacky Christmas with us!
\

Sunday, December 25, 2011

Ollie's First Christmas!

"Good Morning, Merry Christmas Mom!"
Greeting me as I come down the stairs.
Hi all!  Merry Christmas from me to you. Our house is pretty low key around this time of the year.  The most exciting thing is that my sister is in town from Spain!  She is only here once a year because she lives in Madrid...what was supposed to be a fun summer with me as au pairs in Spain turned into a 4 year adventure for her as a teacher at an English school...so jealous! Anyhoo, we woke up this morning for a yummy breakfast that mom made and then

opened presents.  Ollie got a large bone from my dad for Christmas.  It was probably the best present to watch be received because he didn't know what to do with it at first but then quickly learned it was something he didn't want to share.  Do you see those teeth up above?! Such a gentle creature turned crazy! My dad loves watching movies together so we went to see the new Mission Impossible.  The rest of the day was filled with a family walk, Yahtzee, and lots of food.  What a great day!  I hope everyone was able to have a fabulous day with people they care about.  Cheers!

Wednesday, December 14, 2011

O Christmas Tree, O Christmas Tree!


And….finally, it is our last installment of the holiday link parties.  Since the topic up for grabs is Christmas trees I thought I would share all the trees I’ve got going for my Christmas decorations at home.
I love real Christmas trees – the smell, the look, the tradition of picking them out.  This year’s wasn’t as tall as I would love it to be but we wanted to budget and make it easy to carry in and out.  I always do the real tree in the living room in purples, golds, and silvers.  I love these colors because of my favorite NBA team the Lakers but that is not what I was going for when I was picking them out.  Somehow it works though!  I try to keep all the ornaments on this tree in that color scheme.  For the topper all I did was buy some of those glittery sticks at Walmart and tie them in a bunch to the top.  I also added some throughout the tree for a little texture.  I love how simplistic it all is and how it goes with the white fireplace mantel I decorated.
Since you can’t see the tree from the street I had to add a tree in the dining room.  This one is fake – I know I love the real ones but two real ones makes for too expensive – and messy!  We got one off of craigslist last year for free for this room but it was huge and way too complicated to put together.
So we decided to scale down and got this one at Target for $40 during the Thanksgiving sale.  I love all the various colors and different meanings of the ornaments. This is the tree where anything goes – it doesn’t have to be a certain color to make it on the tree.  And I love how it looks from the outside.  Something for the neighbors to look at while they walk by!
Each year we get an ornament that is symbolic of something that happened during the year.  Last year it was our new puppy, Bodie, so we got a Labradoodle ornament.  Since Ben and I got engaged this year we got a diamond ring….don’t think my ring looks quite like this but I do love the sparkle!
And last but not least is this sweet Carolina Hurricanes themed tree.  This is my favorite since Kim and I are part of the Eye Care Associates Storm Squad.  The jersey ornaments were given out to fans at games in my first year and I bought the ornaments with the Hurricanes logo on them at our local Hurricanes store.  I added various red ornaments since our colors are red, black, and silver, and topped it off with some darling ice skate ornaments I found at Target.  It is so much fun to have a themed tree with something that is so personal like a favorite sports team.   


I hope you enjoyed all the link parties and the Christmas crafts have surely put us both in the spirit.  Check out Sarah’s blog as well to see where we linked in.  Hopefully we’ll survive the holidays and have some more updates to our houses and other DIY things we’ve had to put on hold. 
I'll leave you with a few more holiday decorations I've got going on around the house.  Thanks for stopping by!  11 more days until Christmas!


Monday, December 12, 2011

$2 Pottery Barn Holiday DIY Pillow

Welcome to our third installment of holiday link parties we told you about our participation in here.  Today’s theme is “Holiday Crafts” and we found our inspiration in a Pottery Barn catalog.  Don’t you love all the holiday pillows they offer like these? 
We both fell in love with this one called the ‘Poinsettia Decorative Pillow.’  Not only was it out of our price range ($29 for just one pillow cover – not the pillow itself) but it also was no longer available.  We loved all the neutral colors and decided we would try to make our own version of this lovely pillow for the holiday times for both of our houses.
Since Kim had some extra burlap hanging around at her place we decided to use this instead of the linen Pottery Barn used.  Since holiday times are extra busy around here we wanted to forgo any sewing so we searched for a DIY no sew pillow tutorial on PinterestWe found this awesome one that basically involves folding and tying the fabric into a cute bow.  Look here for a great tutorialWe both had extra pillow forms or old pillows so we didn’t need to purchase these for our pillow cover. 
We did need to purchase felt and the tiny bells.  As you can see in the pic above, the center of the Poinsettia is in fact miniature ornaments, not bells...there was a slight hiccup when Kmart "ran out" of small jingle bells so we had to choose an alternative.  The ornaments were on sale because there weren't many left and they were breaking fast (we had to do the whole switcharoo trick to get a whole box of perfects), so we got a box of 28 for $2.89.  Only using 7 ornaments per pillow, we can make 4 Poinsettia centers for around $0.75!  We picked up some off-white felt at Joann’s for $4.99/ yard that was marked down to $3.13.  With our 40% coupon, the total came to $3.10 for a yard and a half of the fabric.  
From there all we had to do was cut out the felt into different poinsettia petal and leaf shapes.  We cut them from large to small so that we could layer them like the inspiration pillow.  We used a total of 8 large petals and 4 small. 
As mentioned, we wanted no part in a sewing machine but we did want the cute vein (not such a cute word?) look running down the petals.  We took a small square of burlap and just stitched each petal onto the square and created the center stitch running down the petal as we went along.  It took absolutely no time and was too easy.   We then stitched each of the ornaments (7 total) into the center of our petals and pulled tight for them to bunch together.  After our poinsettia was complete, we anchored it down with a few quick stitches into the small burlap square behind the petals.  
We were so shocked at how much we adored our new poinsettia pillow.  It looks so close to the one that would have cost us $29 for one and we spent under $2 for each one!  Even if you don't have burlap on hand you can find it very cheap usually or you can use any fabric that you do have.  It will still come in well under the $29 Pottery Barn price!
We are so excited to use them with our holiday décor this year.  Check us out on Kate's link party! Any other Pottery Barn holiday inspiration pillow projects out there?  13 days til Christmas!

Pottery barn images found here, here, and here.
 

Friday, December 9, 2011

The Grinch Does Not Live Here

Wow.  I think that is pretty much all you can say when passing by this house.  There is always that one crazy neighbor that decides to tackle the task of hanging an abundant amount of Christmas Lights and this year, the deserving award goes to my parent's neighbor.  I really had to share it with everyone because it is so crazy to me!  There doesn't seem to be any pattern or order to these lights at all...I simply vision a little Christmas elf standing in front of the house, waving a wand and saying poof and lights just fall all over the place.

You know what though?  I LOVE it.  I feel no matter how old or young you are, you enjoy looking at the lights and with my parents having simple and classy little candlelights in each window, the neighbor's house is definitely a sight to see.  Not only do these sweet people have a lot of visitors driving by but they also are collecting donations to give to charity.  Now that is the Christmas spirt and the grinch most definitely does NOT live here!

As Christmas is sneaking up on me, the cold weather finally is too!  North Carolina has been so warm this year it is insane and Ollie hasn't had the opportunity to wear his fancy jacket that his babysitter gave him.  He will probably tear the thing off but it is so worth sharing.  He was such a stiff little model because I don't think he knew what to do with the thing on.  Enjoy!

Wednesday, December 7, 2011

Chalky White Christmas Mantle

Welcome back to part two of the holiday link parties we are participating in!
                                       
This time I’m featuring my mantle I decorated with a little Christmas flair.  It was super cheap to do – costing me a grand total of $8!  Since my fireplace is white brick floor to ceiling I knew I wanted a dramatic feature to draw the eye to the mantle.  I decided I would chalkboard paint (no kidding!) the back of a matted frame and write a special Christmas saying on it.  I somehow scored big at Goodwill with a large frame that was $8.  However, it was one of those custom framed jobs so I had to pry each and every staple out of the back.  Luckily it was already white so I just took some Distress Ink to it to give it a little worn look.  On went the chalkboard paint and that was all it took.     


I added items from around the house to finish up the job and give it a wintery feeling.  I just added a candle display, some candlesticks from Ikea, our embroidered stockings (Ben and my stockings are from Pottery Barn and Bodie’s is from Target – cheaper and looks pretty similar huh?).  I stole had the nice guys from the Christmas tree lot load me up with extra tree branches and just layered them on.  I kept the colors simplistic because my tree is purples, silvers, and golds so I didn’t want too many contrasting colors.

Can't you just imagine the crackling fire?  Get me some hot cocoa and Christmas tunes stat please!  Make sure you check over at Rhoda’s blog to see us linked to the Merry Mantles link party.  18 days to Christmas!


Tuesday, December 6, 2011

Tacky X-Mas Time!

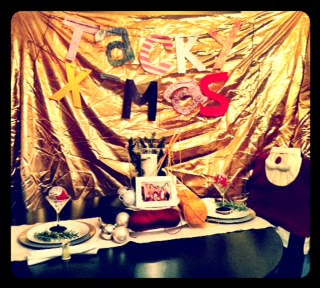
We're gearing up for our annual Eye Care Associates Storm Squad Holiday Party that we always plan.  This year we will be celebrating these joyful times in the spirit of tackiness - a Tacky Sweater Party that is!  This is the first of four holiday link party posts we are doing so this one has to do with our holiday tablescape:
We wanted to practice our tablescape before the big night and also so that we could link up the party!  That is when we decided we would focus on an oxymoron tablescape - a "sophisticated tacky" tablescape.  We wanted all the elements of a tacky sweater party in there but didn't want it to be over the top.  Make sense?  It didn't really to us either but we didn't want to just throw random things on the table and call it a day.   
Our main focus was on the party favors we will be giving as they serve as our place cards as well - so thrifty!  We went to work dipping martini glasses in chalkboard paint (we love it) and making glitter and feather ornaments.  Don't worry - we'll include the DIY details when we tell you how it goes this Friday.  We used a shiny, shiny gold tablecloth we found in the attic and used that as a backdrop for our scrapbook letter banner that said "Tacky X-Mas."  Didn't even bother steaming it!  Next came the sophistication - we just placed our ornaments in the martini glasses we had made and wrote our guest's names on them.     
We plopped these in the center of the plates on top of some cut outs from the base of a trunk of a Christmas tree and added some fresh sprigs of rosemary for some natural elements.                                                        
The centerpiece was just as easy - we just gathered up some yarn, knitting needles, neutral ball ornaments, a cake plate, a glass hurricane, a candle, "moss" covered stones from the Dollar Store, some Christmas tree branches, and a picture from a past Tacky Sweater Party we held.  All it took was a little "sophisticated tacky" placement of the yarn and ornaments into the hurricane and we got the look we had hoped for!  We also found some Santa chair covers that we placed over the chairs to add some more Christmas into our tablescape.  We'll show you these more up close when we do our complete party post.

This was such an easy tablescape to do for any Tacky Sweater Party you're throwing. We love that it still works for our dinner party since it is tacky but with a classy twist. We hoped you enjoyed dropping in on us today and can't wait to check back in with all the party details. Be sure to check out the link party we've joined as well over on Layla's blog The Lettered Cottage.